Imagenomic Portraiture is a plugin that does the heavy lifting on skin smoothing so you don't have to mask and retouch every pore by hand. Underneath the one-click results is a set of controls worth knowing if you want consistent, natural-looking output across a whole session.
Controls beneath the surface
- Skin Mask sensitivity and granularity — lets you widen or tighten what the engine considers skin tone. Useful when the subject has freckles or patchy light.
- Preset strength blending — the opacity slider per preset means you can pull back the effect globally without rebuilding the mask.
- Negative mask painting — quickly paint out eyes, brows, and lip edges so sharp details stay crisp while cheeks and forehead get the smoothing treatment.
The AI smoothing engine in version 4.5
The latest build (4501) ships with what Imagenomic calls a next-generation version of the smoothing engine. In practice, it handles irregular textures with less of the waxy feel that earlier versions could produce on high-ISO shots. When you pair it with the per-channel luminance controls, you get a retouching setup that respects the light falling across a face instead of flattening it into a single plastic surface. That's where the time savings add up — fewer trips back to Photoshop layers to fix what the plugin overcorrected.
Three plugins, three philosophies for skin retouching
Three names come up regularly when photographers talk about skin work on the Mac: Imagenomic Portraiture, Retouch4me Skin, and the native healing and frequency-separation tools built into Photoshop. They solve the same problem but take different roads to get there.
Retouch4me Skin is a standalone app and plugin that leans heavily into AI-driven auto-masking with almost no sliders. It picks the skin areas and applies corrections on its own. That hands-off approach appeals if you want a single-click pass and you trust the algorithm's choices. Portraiture gives you that same one-click entry point but then opens up into manual mask painting, per-channel luminance, and fine-grained sensitivity controls when you need them. For a batch of headshots under consistent lighting, Retouch4me works fast. For a mixed session with varied skin tones, Portraiture's adjustment depth keeps you from fighting the tool.
Photoshop's native tools — frequency separation, the healing brush, and the patch tool — are what many retouchers learn first. They're precise and free of third-party dependencies, but they cost you in minutes per image. A single portrait can eat up fifteen minutes of careful brushing on a high-res file. Portraiture collapses that into a few slider adjustments and a quick mask check. The native route still wins for detailed editorial work where every pixel matters; for volume portrait work, the plugin pays back the time immediately.
The real difference is in how mid-tones survive the smoothing pass. Frequency separation often leaves skin looking slightly flat unless you rebuild texture manually. Portraiture's per-channel luminance controls let you protect highlight roll-off and shadow depth in one panel, which means less rebuilding afterward. That's the feature I'd point to if you're comparing plugins side by side.
A full retouch workflow from import to export
Here's a task-based run-through for a single outdoor portrait session — the kind of thing a weekend mini-session photographer might face on a Saturday afternoon.
- Open the raw file in Lightroom Classic. Apply global adjustments first — exposure, white balance, a gentle tone curve for contrast. Don't touch skin yet. You want a balanced canvas before the plugin takes over.
- Send the image to Photoshop as a Smart Object. Right-click the image in Lightroom and choose Edit In > Photoshop. Keeping it as a Smart Object means every layer stays non-destructive.
- Duplicate the Smart Object layer. Name the top one "Skin Retouch." This is where Portraiture works. The untouched layer beneath serves as your safety net.
- Launch Portraiture from the Filter menu. The plugin opens with a default preset. Zoom to 100% on the subject's cheek and forehead.
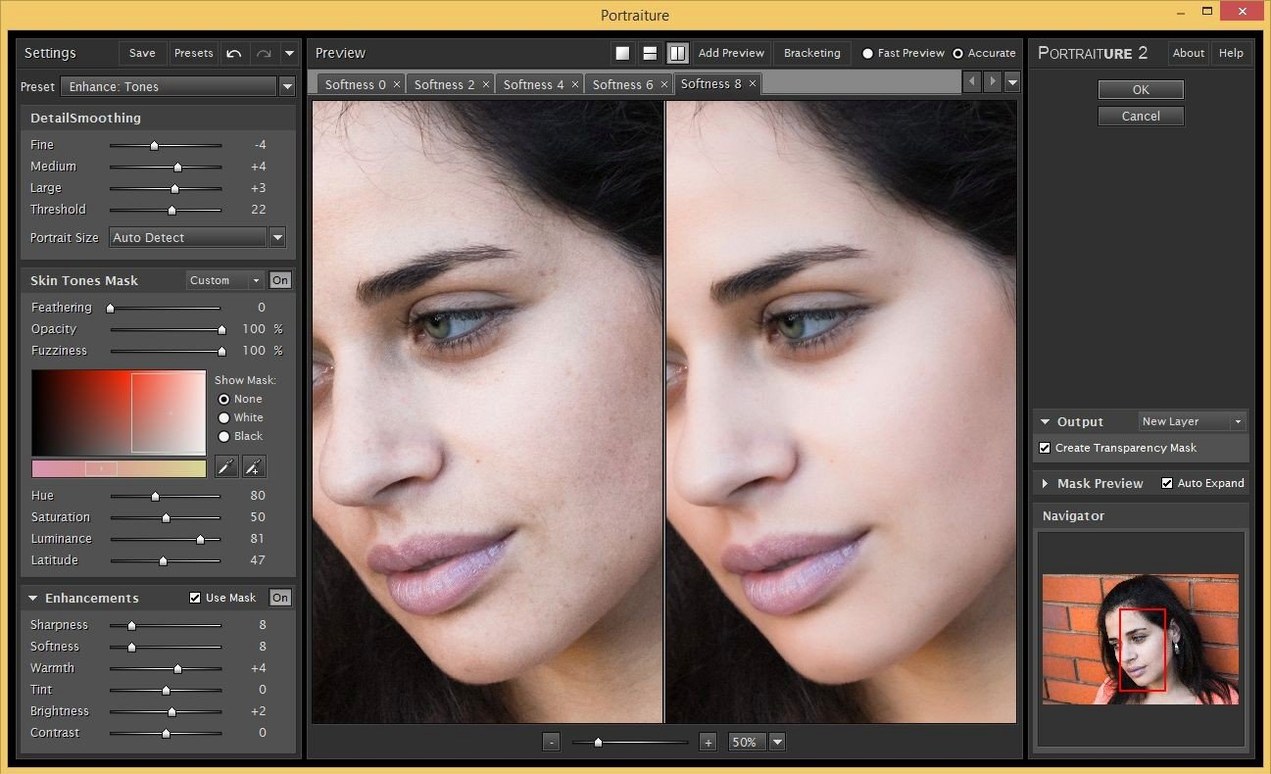
- Check the skin mask first. Switch the preview to show the mask overlay. Adjust the Skin Mask sensitivity until it covers cheeks, forehead, and chin but misses eyes, lips, and nostril edges. If sensitivity alone can't hold those edges, leave it close and plan to paint them out manually.
- Fine-tune the smoothing. Pull the Smoothness slider until texture diminishes but doesn't disappear. Watch the transition zone along the jawline — that's where plugins often create an obvious cutoff.
- Paint out critical details. Grab the negative mask brush and paint black over eyes, eyebrows, lip line, and any moles or scars the subject wants kept. This step takes thirty seconds and saves the image from looking plastic.
- Blend the opacity. If the effect still feels too strong, drop the preset opacity slider to around 70–85%. The underlying skin texture bleeds through just enough to keep the image honest.
- Apply and return to Photoshop. The retouch layer now sits above your original. Add a layer mask and paint out areas where you want to reveal the original texture — often the hairline and ears, where the skin mask sometimes overreaches.
- Final sharpen and export. Apply your output sharpening for print or web, then save the PSD and export a JPEG from Lightroom.
The whole skin-retouch stage runs under three minutes once the workflow feels natural. That's the sweet spot where Portraiture earns its keep.
Forty headshots, one tight deadline
Think of someone who shoots corporate headshots for a mid-size company — forty employees in a conference room turned temporary studio, two flashes on stands, a gray backdrop. The light is consistent, the poses repeat, and the deadline is tight. This photographer delivers eighty edited images by Thursday morning.
They pull the session into Lightroom Classic, sync white balance and exposure across the set, and then send each keeper to Photoshop. With a saved Portraiture preset tuned to the lighting setup, they apply the filter, check the mask quickly at 100%, and move on. The preset includes a slightly wider skin-mask tolerance because the consistent light means skin tones don't vary much frame to frame. Negative mask painting is minimal — maybe a quick stroke over glasses frames when they appear. The opacity slider stays at 80% across the board, giving a uniform look that the HR department won't notice but the subjects will appreciate when they see themselves looking rested and well-lit.
Without the plugin, that same job means an action for frequency separation plus manual brushing on every face. With it, the retouching stage shrinks from a full workday to a focused couple of hours. The time goes back into client communication and the next booking.
Common hesitations before hitting download
It needs a host like Photoshop or Lightroom Classic
Portraiture is a plugin, not a standalone program. It runs inside Photoshop, Lightroom Classic, and Affinity Photo. If you don't own one of those hosts, the plugin won't open on its own. Lightroom CC (the cloud-based version) is not supported, so check that you're running Lightroom Classic before you count on that workflow.
Expect a one-to-three-second mask calculation
The smoothing engine is reasonably efficient, but it's doing real work pixel by pixel. On a high-resolution file from a modern sensor, you'll feel a brief pause while the mask calculates — maybe one to three seconds on an Apple Silicon machine. If you're running an older Intel Mac, expect slightly longer render times, though the plugin supports both architectures natively. Running it as a Smart Filter inside Photoshop lets you toggle the effect off instantly while you work on other layers, which helps keep the overall session responsive.
How does the Lightroom Classic version differ from the Photoshop plugin?
Imagenomic provides separate downloads for each host. The Lightroom Classic build integrates directly into the Develop module's external editor workflow. Functionally, the smoothing engine and controls are the same, but the Lightroom version works on rendered TIFF or PSD copies rather than directly on raw data. The Photoshop plugin has the advantage of Smart Object support, which I prefer for non-destructive editing.
Does it handle darker skin tones well?
The skin-mask sensitivity control is the key here. Widening the tonal range helps the engine recognize skin across a broader set of hues and luminance levels. Testing the mask overlay before applying smoothing is essential — if the mask doesn't cover the skin evenly, adjust the sensitivity and granularity sliders until it does. The AI engine has improved noticeably in recent versions, but the manual controls are still what make the difference on varied skin tones.
High-volume shooters who retouch dozens at a time
Not every Photoshop user needs a dedicated skin plugin. The people who benefit most tend to fall into a few clear categories.
High-volume portrait photographers — school photographers, event portraitists, headshot specialists — face the same retouching task dozens or hundreds of times per session. A consistent preset and a fast mask check save them hours. The plugin pays for itself in time across one busy week.
Wedding and family photographers work under unpredictable light and with subjects of all ages. They need skin smoothing that doesn't look obvious, because brides and grandmothers alike notice heavy-handed retouching. Portraiture's opacity blending and per-channel luminance controls help them walk that line between polished and unnatural, and the batch-friendly workflow means they can deliver full galleries without outsourcing retouching.
Photography studios with a consistent house style can build a preset library that enforces the look across every editor on the team. The presets travel as small files, so a lead retoucher can tune a preset once and share it, keeping output uniform across multiple Macs.
Hobbyists who want cleaner portraits without a steep learning curve benefit from the one-click defaults. They can start with the out-of-the-box smoothing and gradually learn the mask and luminance tools as they go. There's no penalty for staying at surface level, and the room to grow is there when curiosity strikes.
If your work rarely includes faces — landscape, product, architecture — Portraiture sits unused. If faces are a regular part of your catalog, it earns a spot in the plugin folder.
Version 4.5 Build 4501 brings a next-generation AI smoothing engine that handles texture with more nuance.
- macOS 13 or later
- Intel and Apple Silicon Macs
- Host: Photoshop, Lightroom Classic, or Affinity Photo
Notes from other shops 0
Sign in or open a shop account to leave a note.
No notes yet. If you've used this on a shop Mac, tell me how it went.