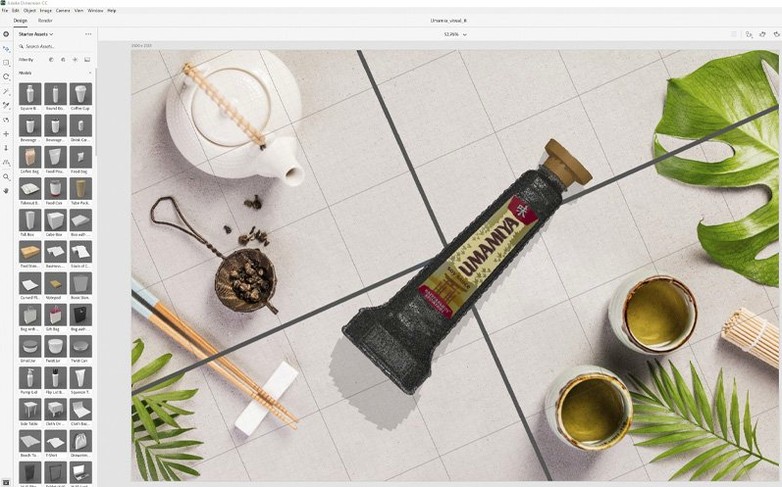
Showing a client what their packaging will look like on a shelf shouldn't require a full 3D animation degree. Adobe Dimension strips away a lot of that complexity so you can build photorealistic product mockups and brand visuals without wrestling with a hundred dials.
Rosetta 2 only on Apple Silicon, plus a security fix
Dimension 4.1.7 needs macOS 11 or newer and runs on Intel Macs. Apple Silicon Macs use Rosetta 2, but native support isn't listed yet. This release also patched security vulnerabilities, so it's worth the update if you're already using it.
Build a scene without the fuss
Pick a model, drop your logo or vector art onto it, and the app handles the lighting, perspective and shadows for you. The material you choose guides how everything reacts, so a matte cardboard box catches light differently than glossy plastic.
Hand the file off when you're done
Export your scene in layers for more detailed editing in Adobe Photoshop CC, or grab optimized 3D models from Adobe Stock directly inside the app. It fits into a workflow where Dimension does the heavy 3D lifting and Photoshop handles the final polish.
Where Dimension fits among your other tools
Dimension isn't trying to replace Illustrator or Photoshop — it slots in between them. You'd prep your vector artwork in Illustrator, bring it into Dimension to map it onto a 3D model, then export layered PSDs back to Photoshop for final color grading or adding hand-drawn flourishes. The roundtrip works because Dimension preserves layer names and object groupings when you push a scene to Photoshop CC. That alone saves you from the headache of re-organizing a flattened render.
It also plays well with macOS clipboard and drag-and-drop. You can pull a PNG mockup straight from Finder onto a model's surface, or copy a Smart Object from Photoshop and paste it as a decal. The Adobe CC Libraries sidebar sits right in the workspace too, so brand assets you've saved from other CC apps appear without hunting through folders. If you've used adobe analytics dimensionen to track which product visuals perform best, you can quickly iterate on the winning layout without leaving the ecosystem.
A label redesign, start to finish
Let's walk through a realistic task: updating a candle jar label for a seasonal line. You've already designed the new label in Illustrator — a botanical print with gold foil accents. Here's how Dimension handles it:
- Launch Dimension and pick a jar model from the starter assets or from Adobe Stock. The glass material preset gets you 80% of the way there.
- Drag your Illustrator file onto the jar's label area. Dimension places it as a decal and auto-wraps it around the curved surface, matching the contour.
- Switch the material finish to something with a slight metallic sheen for the gold foil sections. You can mask the effect to only the areas you want by using a separate opacity map.
- Set the environment light to a warm interior scene. The glass catches soft reflections and the wax inside picks up ambient shadows without manual tweaking.
- Adjust the camera angle to eye-level shelf perspective, tweak depth of field slightly, and render.
- Export as a layered PSD. In Photoshop, you brighten the flame glow and add a subtle vignette. Done.
The whole thing takes about 20 minutes once you know the steps, and the client sees a lifelike preview before a single jar is produced.
Why your 3D scene looks flat when you forget the environment light
Most beginners treat Dimension like a 2D layout app and get frustrated when things don't behave. A few patterns show up again and again:
- Ignoring environment light. New users often crank up the directional light intensity without swapping the environment map first. The environment handles most of the realism — reflections, ambient occlusion, fill light. Change that before touching individual lights.
- Decals that stretch or tile. Dropping a logo onto a curved model without adjusting the decal mapping mode leads to warped edges. Use the cylindrical or spherical projection options in the decal properties panel; it takes two clicks and fixes the distortion.
- Rendering too early. The real-time preview isn't the final output. People see a clean preview and hit render, then wonder why the export looks grainy. Bump the render quality to High and let it finish — the difference is night and day, especially on transparent materials like glass.
- Not checking object scale. If you pull a model from Adobe Stock and place it next to another, their real-world scales might not match. A 15-foot coffee cup next to a tiny chair breaks the photorealism instantly. Use the size panel to unify them before composing the shot.
Tip: When you're stuck, duplicate your scene and experiment on the copy. Dimension's undo history is solid, but having a safety net lets you try bolder material and lighting changes without losing the original setup.
Version 4.1.7 is a security update that resolves known vulnerabilities.
- macOS 11 or newer
- Intel processor (Apple Silicon runs via Rosetta 2)
Notes from other shops 0
Sign in or open a shop account to leave a note.
No notes yet. If you've used this on a shop Mac, tell me how it went.